Stir-fry with Broccoli

Image

Tomorrow is the Chinese New Year, so Gary and I celebrated early by making the only “Chinese” dish we know: an Americanized stir-fry. In China, the New Year is celebrated by big dinners. Additionally, houses are cleaned to remove ill-fortune and to make way for good incoming luck. So although this dish is by no means traditional Chinese cuisine, I’m doing my best to channel their New Year’s themes of happiness and good fortune.

I’ve never been to China, but Gary has been twice this year for work, and came back raving about the multitude of delicious dishes. So many different vegetables and flavors and spices; he loved it all. My version would probably make a Chinese cook cry, but it’s the best I’ve got. My goal is to get more traditional Asian dishes under my belt instead of this fake Chinese recipe that I’m sharing here. Someday.

Image

Our garden has broccoli, carrots, and green onions right now, so of course that was what went in our stir-fry. But nearly any vegetable or meat can be used. Our stir-fries vary with whatever is growing in our garden at the time. Broccoli, any kinds of peppers, mushrooms, eggplant, beans, you name it; throw it in.

Ingredients:

1 bunch broccoli
1 green pepper
1 jalapeno pepper
2 carrots
1 onion
1 lb meat (chicken, shrimp, or beef)
1/8 c cooking wine
1 1/2 c brown rice
1 T coconut oil (or canola)
1 T corn starch
1/4 c soy sauce
2 T szechuan sauce
1 T chili garlic sauce
2 T hoisin sauce

Instructions:

First, start your rice. I add twice the amount of water for the amount of rice, so in this case, 3 cups of water for my 1 1/2 cups of rice. Once it’s to a boil, turn it down to a simmer. Next, chop all of your vegetables. Set aside. Chop your meat. Set aside. In a separate bowl, mix your sauce ingredients. Add all the sauces except the corn starch–add that in last, and mix it in well. Set aside.

Next, get a skillet, preferably a wok, with a lid hot. Turn it on high. Add your oil. Wait a minute or so, and let it get hot. Put in your meat, being careful not to splatter the hot oil. Cook until done. Chicken, which was what we used, takes about 5-7 minutes. If there is any liquid that cooks out of the meat, in a wok you can push the meat up along the sides of the pot while the liquid cooks off. Remove the meat.

Next comes the vegetables. Have your cooking wine ready, and first dump in your vegetables into the hot wok, then throw in the cooking wine, and then cover. Let the veggies steam for about 2-3 minutes or so. Once they look done, throw back in the cooked meat, and then put the sauce over them. Toss until the cornstarch gets activated with the heat and starts to thicken. Serve over rice, and eat with chopsticks.

May we all have good health and fortune in this new Chinese year.

Horseradish

Image

Gary and I attempted our first growing and making our first batch of horseradish. Why go to the trouble of growing and making a condiment that you can buy for $2 at the grocery store, you ask? Good question, actually. But, as the food writers such as Barbara Kingsolver and Michael Pollan, whom I so deeply adore claim, there is goodness to knowing where your food comes from. And this horseradish that I’ll show you here was made with lots of love.

Image

Last Christmas, while we were in Southern Illinois with Gary’s parents, we were given horseradish roots from Gary’s relative who grows and makes his own. Plant them in the spring, they told us, and when the first frost hits, it’s time to harvest. Here in Florida, we had to wait until just recently to get our first true frost. Until then, as the picture above shows, the plant grew healthy and strong.

Image

The roots are strange in that they grow horizontally instead of creating a large taproot. I think the roots are suppose to be larger than ours, but nevertheless, our three plants had quite the mess of roots. Gary dug them up, and was careful not to damage the roots.

Image

Next, we chopped off all the green leaves, and power-washed the roots with the garden hose to try to get off as much of the dirt as possible.

Image

We then peeled all the roots that were larger than the diameter of a pencil, and chopped them into 1″ thick chunks. A vegetable peeler works just great for this task. However, once peeled, be careful: whatever the chemical that makes the horseradish “hot” is activated when the skin hits the air. So, from the moment the root is peeled until it is mixed with vinegar, it will increase in intensity.

Image

Next, process the roots. We used a sausage grinder that we got as a Christmas present this year (thanks, Mom!!) and it worked beautifully. A food processor will work just fine, too. Grate all the root that you have. But, at this point, BE CAREFUL–the aerosolized horseradish smell is potent! As Gary said (since his task was the grating), the smell could be efficiently used for chemical warfare. There was lots of watery eyes, coughing, and some choice words used by Gary. It would be good to try to do this process outside if you can. (Just as a political aside, if anyone wants to try to ban nuclear weapons and replace them with missiles full of horseradish or hot peppers, please count me in. My thought is that bad people will surrender pretty quickly, and no one will die. Win win situation!)

To make the horseradish, mix this in a bowl:

1 c grated horseradish
3 T vinegar
4 T water
1/2 t salt

We put them in small mason jars. Horseradish pairs wonderful with beef. We ate it with grilled beef, caramelized onions, and sharp cheddar cheese on crusty French bread. Deeeelish!

Chili

Image

When it’s chilly outside, there’s nothing better than a big bowl of chili to warm the belly and soul. Okay, okay, I can’t complain about cold weather living in Florida, but we have gotten a touch of the Polar Vortex down here. Temperatures are suppose to get in the mid-20s tonight, which calls for covering our poor garden plants in hope that they survive. This is nothing compared to the sub-zero temperatures in the Midwest, I realize. But our weather here now still calls for warm and hearty soups.

Image

And remember all that summer goodness that we canned back when the temperature was warm? That’s where this comes into play! My canned cupboard is my “happy place,” as Gary calls it. I open it up and it gives me solace knowing that we have lots of pickled goodness to survive on just in case of the Zombie Apocalypse. This chili recipe uses our tomato juice and our pickled jalapenos.

Ingredients:

1 quart of fresh tomato juice (you can buy this if you didn’t juice tomatoes last summer, of course.)
1 lb ground beef (or turkey, or you can omit this and add more beans to make it vegetarian)
1 can chili beans
1 can black beans, drained and rinsed
1 can pinto beans, drained and rinsed
1 can garbanzo beans, drained and rinsed
1/4 c chili powder
3 T cumin
1 t cinnamon
1 red pepper, chopped
1 onion, chopped
S&P
pickled jalapenos for garnish

Instructions:

Heat a large stock pot over medium heat. Brown the meat until done (7-9 minutes). Remove the meat, and set aside. Wipe out most of the extra grease, but leave some in the pot to brown the chopped onion and pepper. Saute them both until done (5-7 minutes). Next, throw the meat back into the pot with the vegetables. Add the tomato juice, and all the beans. Drain and rinse all of them except the chili beans (they normally come with a good sauce that’s good to leave in.) Add the spices–you can play with adding more or less of anything, too. Add dried red pepper flakes if you’d like, or brown sugar, or a couple of squares of dark chocolate if you’re so inclined. Let simmer on the stove top for at least an hour to let the flavors merge. Serve with cornbread (and jalapeno jam from your cupboard, too!)

Beans and Rice with Cilantro

Image

One of Gary’s favorite comfort foods is this beans and rice dish. When our cilantro is thick, this becomes our go-to one-dish meal.

Image

Ingredients:

2 c brown rice
1 lb andouille sausage (or Kielbasa)
1 c pinto beans, drained
1 large onion, chopped
1 red pepper, chopped
3 cloves garlic, minced
1 bunch cilantro, chopped
1 c chicken stock
1 T hot sauce
1/8 t black pepper
3 T apple cider vinegar

Instructions:

Start the rice; add 4 c water to your 2 c of rice. (Brown rice takes longer. You can use white rice, but brown is better for you.) Slice the sausage into 1/2 inch thick disks. Heat a big stock pot to medium high heat. Add a little bit of olive oil, and add the sausage and brown it for about 5-7 minutes. Once browned, remove from pot. Leave the browning from the sausage in the pot. Depending on how much oil is left in the pot, you may need to add more olive oil to brown the onion and pepper. If there looks to be about a tablespoon of oil, no need to add any more. Sauté the onion first, and stir for 3-5 minutes. Next add the minced garlic and chopped pepper to the onion, and sauté for 3-4 minutes more. Add the chicken stock, vinegar, hot sauce, and cracked pepper to the skillet. Mix until the browning comes up off the bottom of the skillet. Add the drained beans and stir until heated. Remove from heat. Add the sausage and cooked rice and stir. Add the minced cilantro right before it’s served. Garnish with additional hot sauce if you’re still wanting some heat. Enjoy!

Limoncello

Image

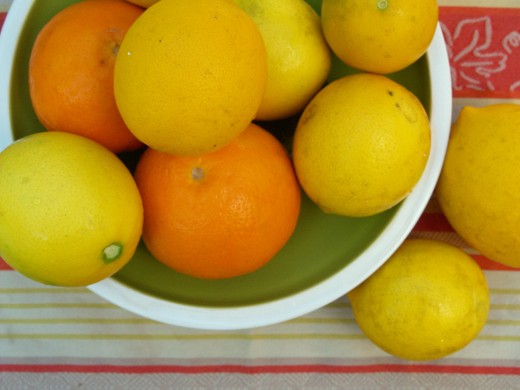
When life gives you lemons, make limoncello. Limoncello is a lemon liqueur that I was first introduced to while studying in Italy in collage. On a weekend trip to Cinqueterre, five tiny fishing villages that are placed on cliffs right on the Mediterranean, my sister and I stayed at a woman’s house who rented out a room for tourists. She spoke no English, but greeted us warmly with a tiny glass of limoncello to welcome us into her home. I’m sure it had to do more with the intoxication of the beautiful Italian everything than the tiny sip of sweet lemon liqueur that stands out in my memory; nevertheless, the smell of it can bring me right back to the Riviera. So, ever since I’ve had a yard full of citrus, limoncello has been made.

Image

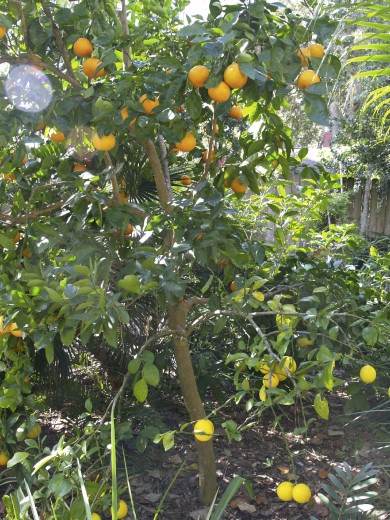
As I’ve posted about before, our fairly tiny urban yard has a Meyer lemon tree, a Mandrian orange tree, a limequat tree, and my favorite: a cocktail tree! What is a cocktail tree, you ask? It’s a tree which has five different kinds of citrus grafted to the stem. So, our one cocktail tree produces Navel oranges, Honeybell oranges, Meyer lemons, Ruby Red grapefruits, and Persian limes. Truthfully, not all of them do wonderfully–our Persian lime branch is pathetic, and the grapefruits taste terrible–but three out of the five are awesome.

Image

{The Honeybells are on the top, and the Meyer lemons are on the branch at the bottom. The grapefruit is on the other side.}

Most limoncello recipes I’ve found are really liquor-y, which makes me not really a big fan. But this recipe cuts the liquor with whole milk, making it like a spiked lemony ice-cream.

Ingredients:

8 organic lemons
2 organic oranges
1 liter (33.8 ounces) vodka, or 4 1/4 cups
8 3/4 cups whole milk
5 pounds sugar (10 cups)
1 shot glass whiskey
1 teaspoon pure vanilla extract

Instructions:

Image

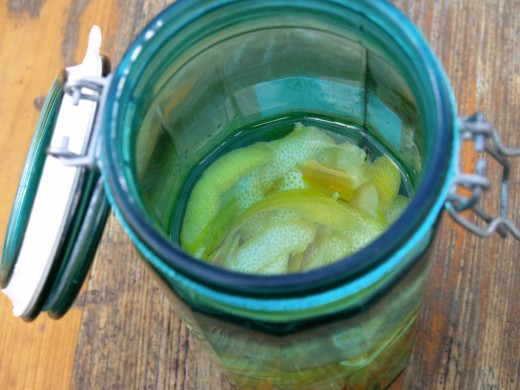
To make this recipe, you have to start well in advance. I’ve experimented with all kinds of lengths of time to soak the zest. You need AT LEAST a week, but preferably a month.

That said, here’s the rest of the instructions. Zest the lemons and oranges with a vegetable peeler. Try not to get the white pith. Put the citrus peels in a glass bowl with the alcohol. I used a large cylindrical glass container with a lid. You want to make sure that it’s covered tightly, or it will evaporate. Also, make sure you use organic citrus; the alcohol will leach out all the oils from the citrus, but it will also leach out any of the residual pesticides.

After either a week or a month, enough time for the alcohol to take on the flavor of the citrus, then you’re ready to make your limoncello. Strain the liquid and discard the peels. Pour into a very large, heavy-bottomed saucepan. I use my 15-quart one. The larger the better. I will get to the reason why you need something large in a second.

Add the milk, sugar, whiskey, and vanilla. Bring all of this to a boil. BUT NEVER TAKE YOUR EYES OFF THE POT, EVER! I have to stress this because one time I almost burned down the house making limoncello (this drink would NOT have been the fabulous memory-maker that it is if that happened.) I’m not quite sure why the combination of these ingredients tends to foam up when it starts to boil, but it does as soon as it reaches 212 degrees. And, because this is half alcohol, it’s mega-flammable. Even though I used my biggest pot, and was definitely trying to keep my eye on it before it boiled, it foamed up when it reached the boiling point, boiled over the edge, and I had a giant fire-ball on my stove top. NOT COOL. Fortunately I had the lid nearby (which I recommend you do) and I shut off the gas to my stove and covered the pot and the flame extinguished. Please do not make this mistake. Use your biggest pot, keep the lid nearby, and never take your eye off of it when you’re bringing it to a boil.

Okay, that said, once it does get to a boil, immediately reduce the heat and just let it bubble for five minutes. Stir continuously. Remove from heat and let it cool completely. A thin film will form on the top, but that’s normal. Skim it off and discard. Pour into bottles and freeze.

I keep this in mason jars in the freezer (it will make 4 quarts), and it will last for a long time. I use it as a digestive for after dinner when we have guests over. It just might make you be hungry for Italy.

Pork Sausage

Every New Year’s at Gary’s parents, the neighboring farmers get together to make sausage out of their butchered hogs. They all pitch in throughout the year on feed, and when the pigs are fat around Christmas, it’s time to butcher.

Image

The skinned hog minus its entrails hangs for a couple of days in the cold barn.

Image

The farmers grab the hog, and bring it to the chopping table.

Image

With their sharp knives, the farmers cut out all of the bones and connective tissue. The fat is left to mix with the meat.

Image

The meat is then put into a meat grinder with spices.

Image

The ground meat is then put into a cast iron sausage stuffer. They use natural casings for the sausage. It’s a two person job; one person cranks, the other person stuffs.

Image

Image

The individual links are made by twisting the stuffed casing.

Image

Image

The end product is vats of sausage links that are then divided up between all who helped. We were lucky enough to come home with a few links of our own as well.

Salmon and Crabmeat Dressing

Gary and I spent Christmas in the Midwest with our wonderful family. We did all the fun wintery things: cross-country skied, built snowmen, and went sledding. (We left just in time to escape the sub-zero temperatures!) And of course, many delicious meals were had.

Special occasions at my family call for Lake Michigan salmon. My grandpa goes fishing there every year and always comes home with these beautiful Midwestern fish.

Image

{Who says you need an ocean to catch big fish?}

Image

{Grandma, displaying the silvery beauty.}

My grandma found a crabmeat dressing recipe that was wonderful with the salmon. It’s easy to make, and adds extra deliciousness to the fish.

Ingredients:

2 lbs salmon fillet1 6 1/2 oz can of crabmeat
2 eggs
2 T butter
1/2 c onion, chopped
3/4 c celery, chopped
2 slices bacon, minced
1 c fresh breadcrumbs
1 t Worcestershire sauce
S&P

Instructions:

Preheat the oven to 350 degrees. Drain the can of crab and flake the meat. Add two slightly beaten eggs, and set aside. Melt the butter in a skillet, and saute the onion, celery, bacon, and breadcrumbs. Combine these ingredients with the crab mixture. Add the salt and pepper and Worcestershire.

Line a baking pan with foil. Grease the foil. Wash the salmon fillet and dry it. Put the fillet on the foil skin side down. Spread the dressing on the top of the salmon. Wrap the salmon and dressing with foil so it cooks in the foil pouch. Cook for 45-60 minutes, or until the dressing and salmon is firm.

Image

We served it with Brussels sprouts, spinach salad, and wild rice. It was a feast fit for a king!